How to Upload Screenshots From the Last Session
Gamers love to have screenshots (single or series of screenshots) during the gameplay either to share their success, something interesting to share, to written report a bug, or just to save a game memory. Steam, one of the leading gaming platforms, has given its users the ability to take screenshots during gameplay by just pressing a hotkey (for Windows the default key is F12 or Fn + F12, for Mac, it is F5) and a notification is shown on the screen that the screenshot is saved.

At the end of the gameplay, the player is served with the screenshots taken during the gameplay (in form of a post-game summary).

But there comes a time when a user wants to check an old screenshot or needs to access the binder where the Steam customer is saving the screenshots, so, how to access the folder?
With such a groovy platform, the process to find the screenshot is not quite easy (they have their reasons). In that location are three methods to access the Steam screenshot folder:
- Through the Steam Screenshot Manager.
- Through the File Director of the Os (Windows, Mac, Linux, etc.).
- By Setting Upwards a Customized Screenshot Folder.
Through the Screenshot Manager of the Steam Customer
The easiest method to find the Steam Screenshot folder is to utilise the Screenshot Manager of the Steam client.
- Launch the Steam customer and expand the View menu.
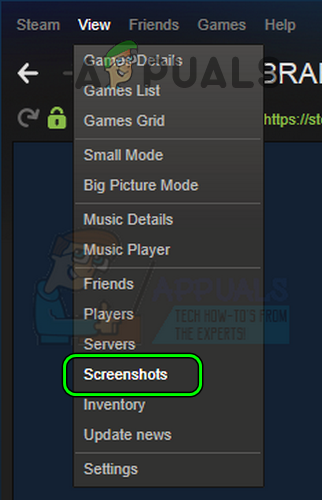
Open up Screenshots in the Steam Client - Then open Screenshots and in the Prove dropdown card, select the game whose screenshot you want to meet.
- Then select a Screenshot in the screenshots panel and click on Show on Deejay.
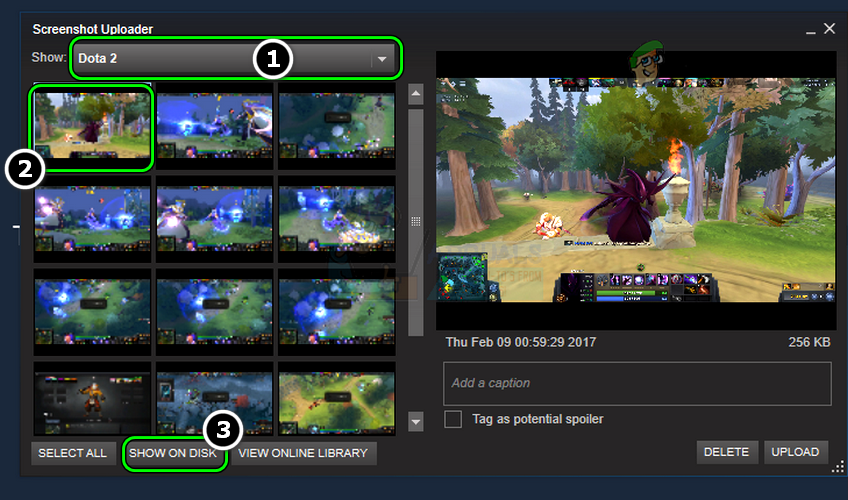
Show the Screenshot on the Disk - This will launch the Os'southward File Director (like Windows File Explorer) showing the screenshot directory of that particular game. Keep in mind the parent directory for the screenshots is the same but the sub-directory will exist dissimilar for each game.
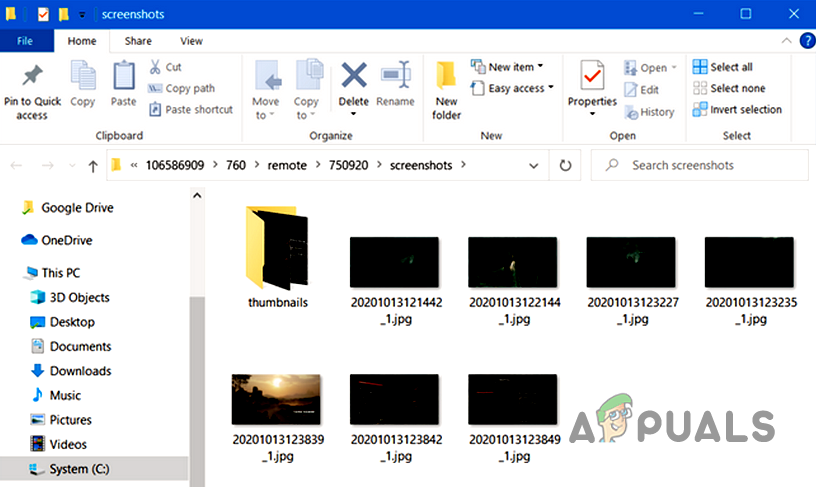
Screenshot Folder of a Particular Game is Launched in the File Explorer - Now you lot can notice the path of the screenshot folder and create a shortcut of it to admission it in the hereafter.
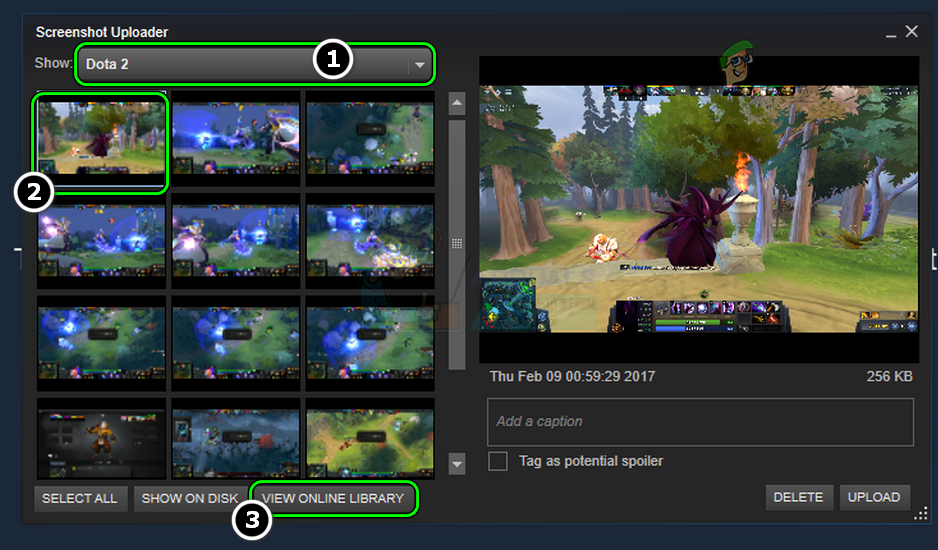
If a user wants to view his screenshots online, he may select the screenshot in the Screenshots Manager and click on View Online Library.
Use the File Manager of the OS
There can exist times when launching the Steam client and going through all the update routines merely to detect a screenshot is not ideal. Hither, a user may want to utilise the File Manager of the OS to notice the binder only that process is not so simple (although using the OS's search functionality to search for images can too be used).
For Windows Users
In Case of a Single Steam Business relationship is Used in the Steam Customer
If a single Steam account is used, so the procedure to find the Steam Screenshot folder is a bit simpler.
Alarm:
Do non rename or delete a folder in these directories, otherwise, you may observe problems in taking screenshots of the games or launching the Steam client.
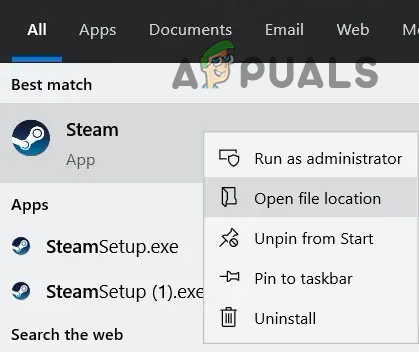
- Right-click on the Steam shortcut (on desktop or in the Offset carte du jour of Windows) and select Open File Location. This will open the installation directory, unremarkably, the post-obit:
C:\Programme Files (x86)\Steam
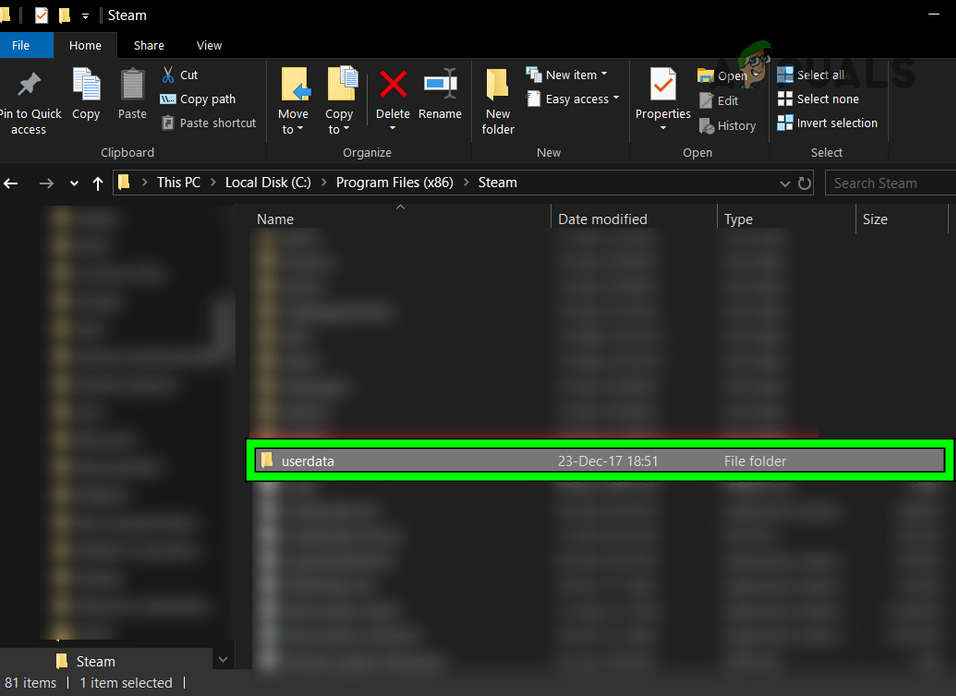
Open up the File Location of the Steam Client - Now double-click on the userdata binder and open the folder with numbers equally a proper name (these numbers are a user'south Steam ID). In case a single Steam account is used in the Steam client, then there will exist only one folder. In case, multiple Steam accounts are used in the Steam client, then there can be other folders with numbers as well. In that example, a user may open the folder with numbers ane past 1 to find out the Screenshots binder of the user or try the Steam ID method (as discussed later).
Open the userdata Binder in the Steam Installation Directory - Once the folder with numbers equally a name is opened, double-click on the 760 folder and after, open up the Remote directory.
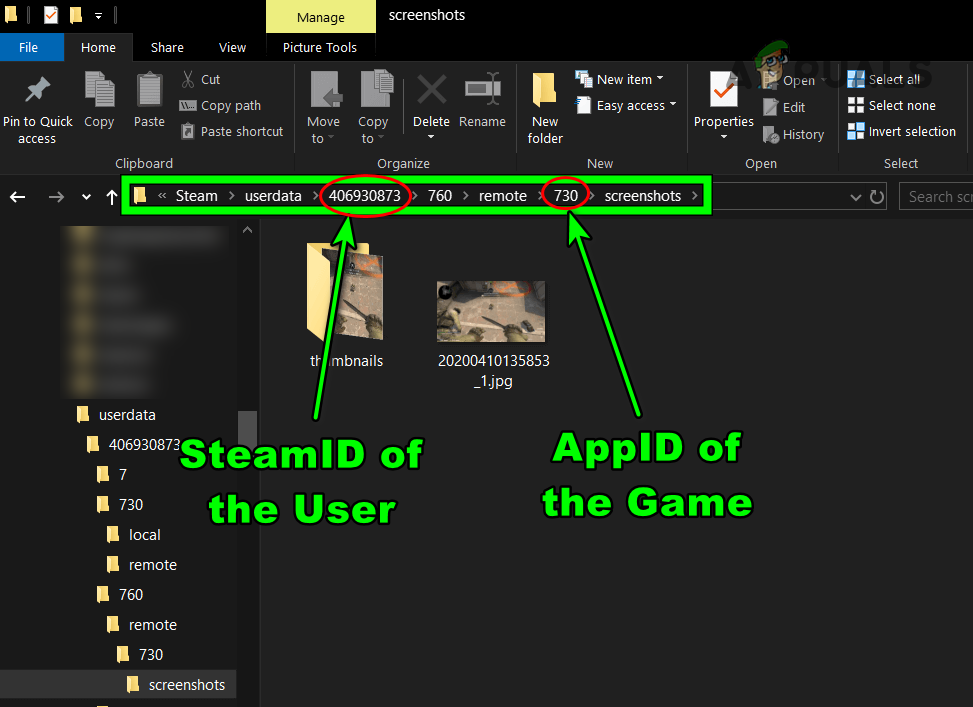
Open the Screenshots Binder in the Steam Directory - At present a lot of folders with unlike numbers may be shown (if a lot of games are installed in Steam). These numbers are the AppIDs of the Steam game. Each Steam game has a unique AppID and yous can find the AppID of the Steam game or open all folders i by one to search for the particular game's contents.
- Once the particular game folder is opened, double-click on the ScreenShots folder to open the particular game'southward screenshots. The complete screenshots path can be as under:
C:\Program Files (x86)\Steam\userdata\<SteamID>\760\remote\<AppIDofGame>\screenshots
Notice the Steam ID in Instance of Multiple Steam Accounts
If multiple Steam accounts are used in the Steam client, then a user may become confused at step 2 of the to a higher place method. In this case, finding the Steam ID of a particular account would exist a improve option.
- Launch the Steam client and expand the View menu.
- Now select Settings and in the Settings window, caput to the Interface tab.
- Then, in the right pane, checkmark the option of Display Steam URL Accost When Available and click on OK to utilize the changes.
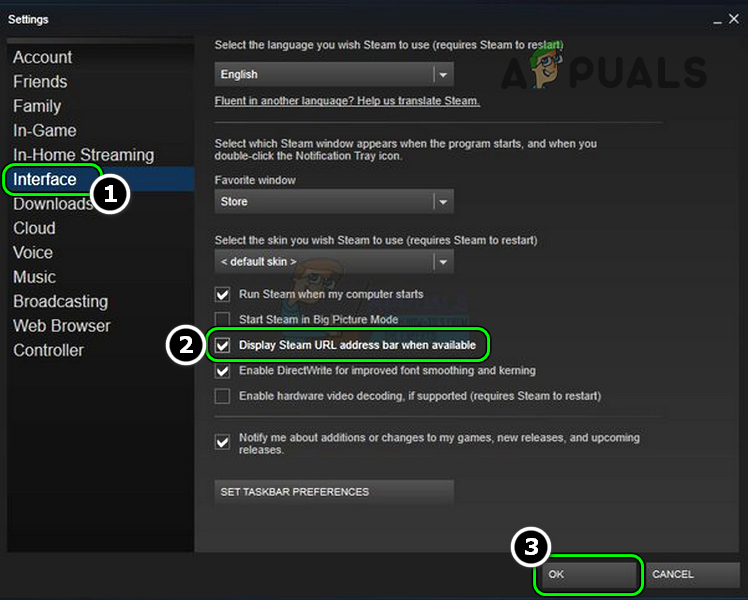
Enable Display Steam URL Accost When Available - Now click on the username in the acme correct of the Steam customer and select View My Contour.
- And then, on the top, a URL will exist shown and the last numeric digits are a user'south Steam ID. A user can also bank check his Steam ID on Steam's website.
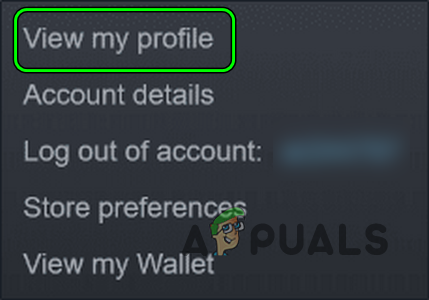
Open View My Profile in the Steam Client - At present open the userdata folder in the installation directory of Steam and double-click on the folder which matches your Steam ID.
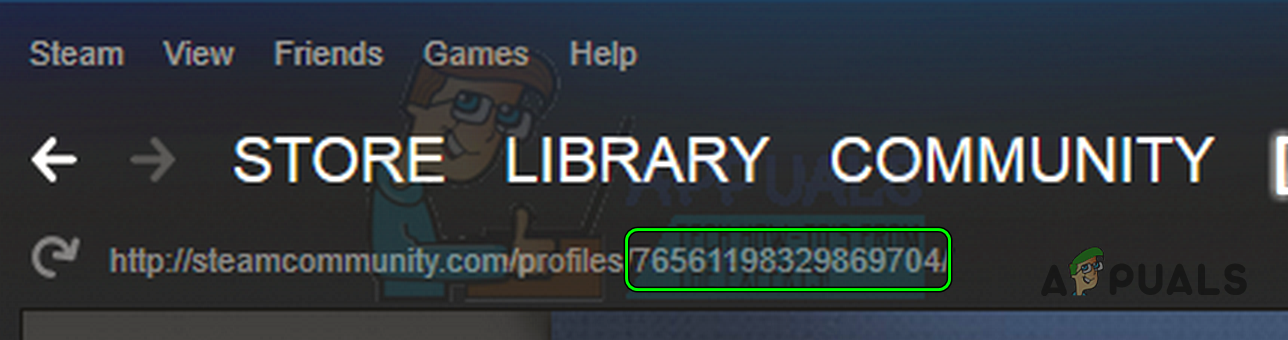
SteamID in the User profile URL of the Steam Customer - Then open the 760 folder and double-click on Remote.
- Now open up the folder of the particular game (as discussed in step 4 in the to a higher place method) and double-click on the Screenshots binder.
- Then y'all tin can create a shortcut of the Screenshots binder if you have to access information technology ofttimes.
For Mac Users
The default installation directory of Steam on a Mac is as follows:
Users/{MacUserName}/Library/Application Support/Steam At present a user may follow the steps discussed in the previous method to discover the screenshots of a detail game. If the installation path is dissimilar, correct-click on Steam, select Get Info, and note the path of the installation nether "Where".
For Linux Users
The default installation directory of Steam on a Linux distro (like Ubuntu) is as follows:
~/.local/share/Steam
Then a user may open the screenshots folder of a particular game by finding the game's AppID (every bit discussed earlier).
Utilize the In-Game Tab to Setup the Customized Screenshots Folder
In that location can be times where a user may want to ready up a customized screenshots folder east.g., to share on the local network or add to a cloud service and a user may accomplish the same by using the In-Game tab of the Steam client.
- Launch the Steam client and expand View.
- Now select Settings and in the left pane of the window, head to the In-Game tab.
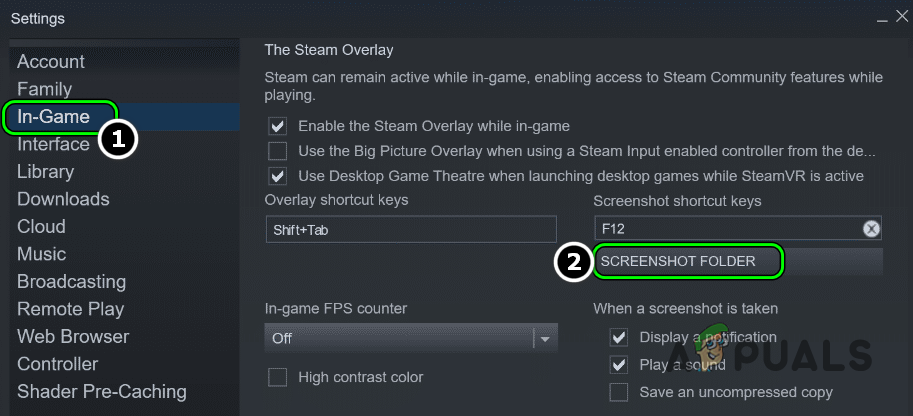
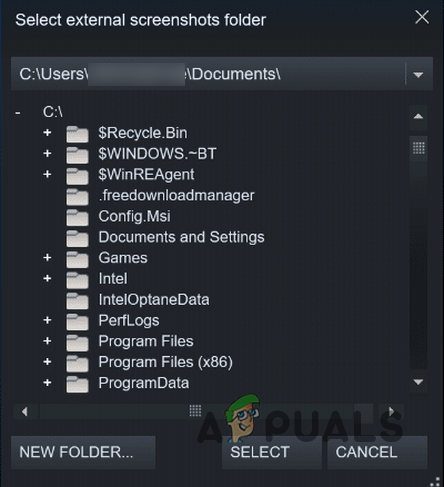
Open up the Screenshot Folder in the In-Game Tab of the Steam Client's Settings - Then, in the right pane, click on Screenshot Binder (under Screenshot Shortcut Keys) and select the directory where y'all want to put your screenshots.
Open the Screenshot Folder in the In-Game Tab of the Steam Client's Settings
Keep in mind the screenshots will be saved on both locations i.eastward., in the installation directory of Steam (in the JPG format) and customized path (in PNG format, uncompressed version is preferred). In case a user only wants to prepare only ane folder of his selection, then he should delete the Remote binder in the following location of Steam'southward installation directory:
C:\ Program Files (x86) \ Steam \ userdata \AccountID\760
Then execute the following in the elevated Command Prompt (brand sure to replace the <SteamID> with the actual number):
mklink /D "C:\Program Files (x86)\Steam\userdata\<SteamD>\760\remote" "D:\newfolder"
If you desire to further customize the screenshotting procedure, and so either a user may use the OS's screenshotting feature or try a 3rd party app.
![]()
Source: https://appuals.com/access-steam-screenshot-folder/
Post a Comment for "How to Upload Screenshots From the Last Session"